Features
Shop
6 August 2020
How to create a Shop?
Utip is not just compensation via direct payment 💳. It is also possible to offer products to your community, thanks to a Shop 🛍️. And here's how ...
Create and access your Shop
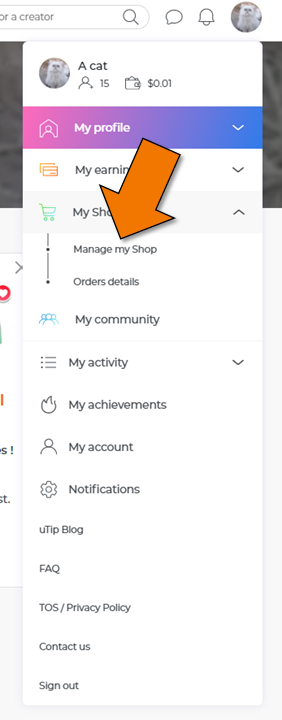
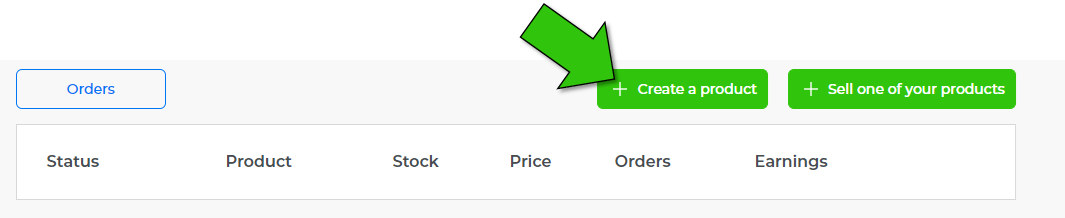
1. To create your first Shop, go to the menu at the top right:
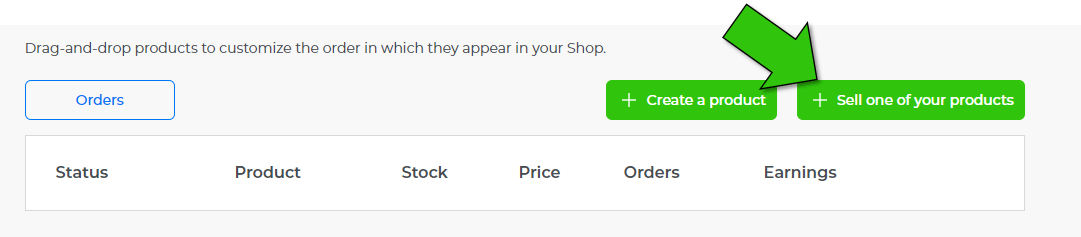
2. Click on "Sell one of your products":
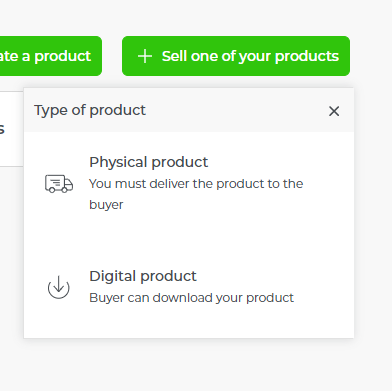
Then choose the type of product :
Create a product
Here is what the product creation interface looks like:
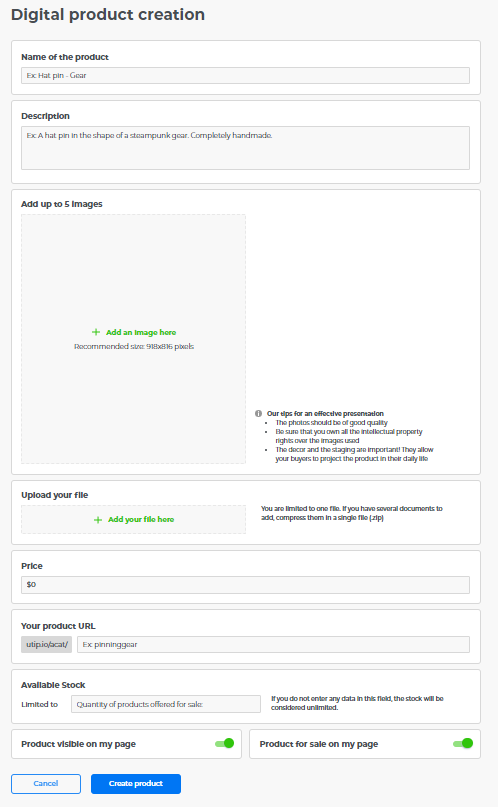
1.Enter the name and description of your product (limited to 150 characters):
2. .Add your visual:
3. Then define the minimum amount at which your product will be sold, and choose the address at which it will be available (choose a simple and concise name):
Good Tip: for a physical article, it is not necessary to count the shipping costs in the price. A specific module dedicated to shipping costs is available when creating the article.
4. Configure your shop
Stock available: do you have a limited number of items to sell? If yes, click on the cursor, then enter the available stock; if not, leave the cursor on "unlimited".
Product status: if you want your product to be visible on your profile, the status of your product must be "Public". If, on the contrary, you want only people with the link to your ShopLink to be able to order your item, leave the cursor on "Private".
Product status: Is your product available for sale? If so, leave it "on". If not, click on the slider to put it "deactivated".
5. Define the shipping fees
0 0How can I create and sell clothes?
In order to allow you to easily propose 👕 clothing to your TipRs we decided to work with Teezily, which allows you to create T-shirts, sweatshirts and tank tops, with your own designs.
Once ordered by a TipR, these items are directly printed and shipped by Teezily, so you don't have to worry about anything.
To create a clothing item, nothing could be more simple:
1. Click on "Manage my Shop"
2. Then click on "Create a product":
The uPrint creation interface is displayed.
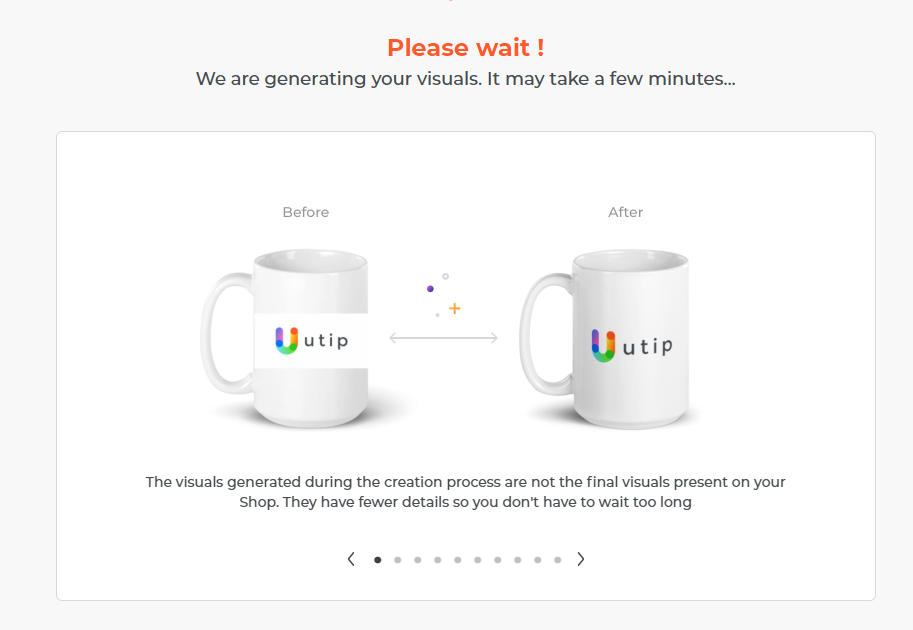
3. Import your designs. To do this, click on the little extras and choose a good quality jpeg. We recommend 16 x 16 cm - 300 dpi - RGB images. Then click on "Generate"
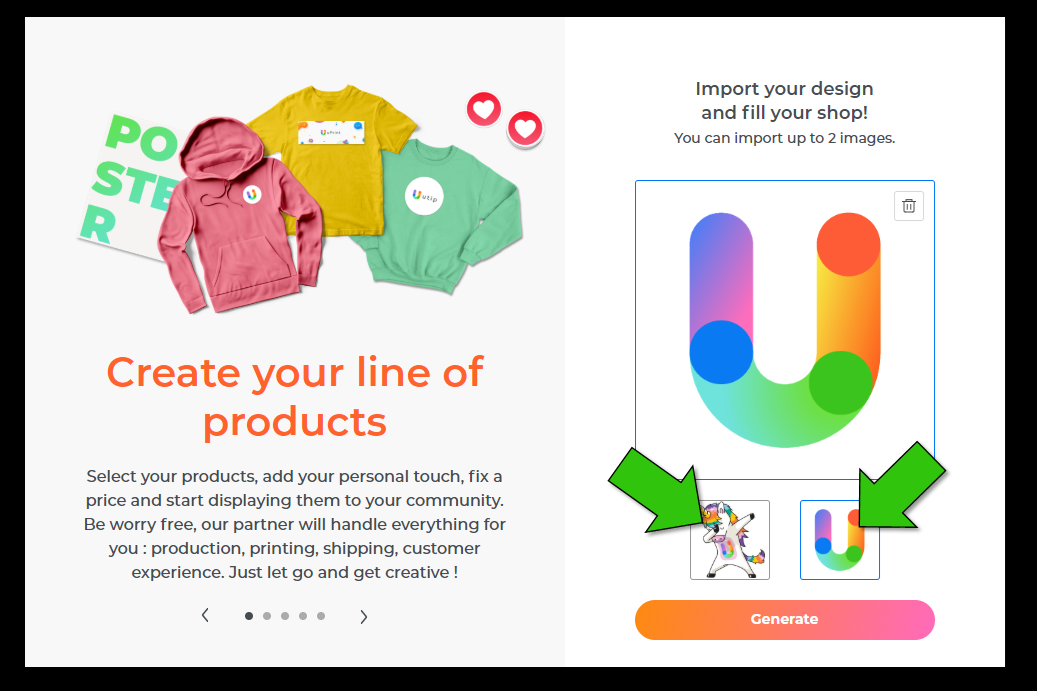
Your products will then be created and this may take a few minutes.
💡 Take this opportunity to read our advice.
4. Then select the products you like from those offered to you.
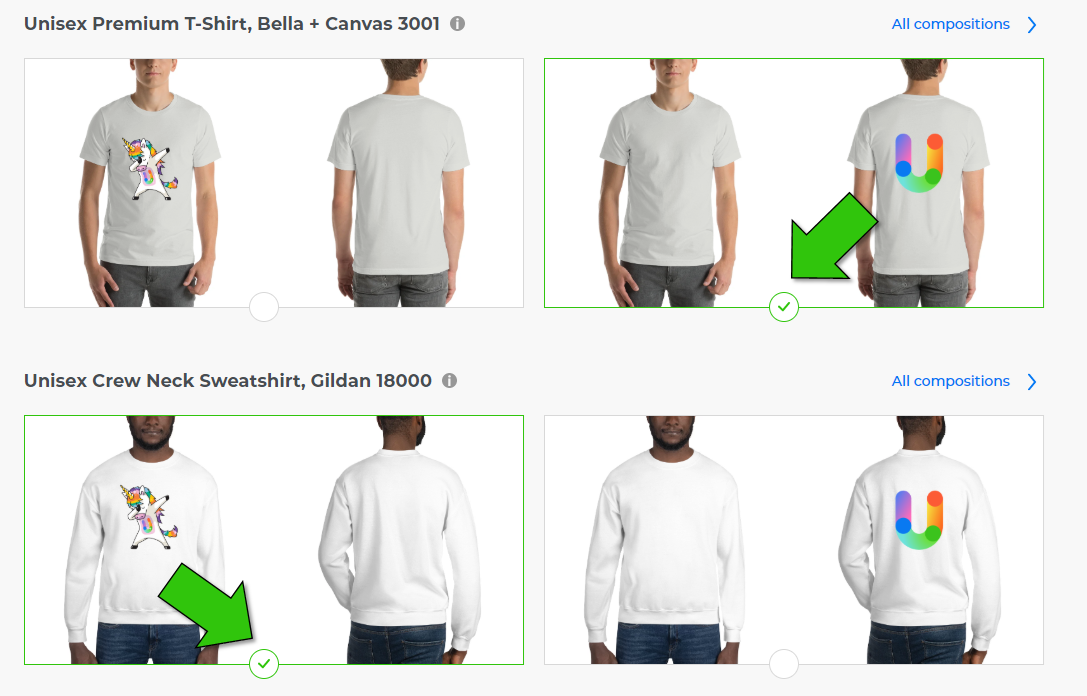
Currently, the following products are offered in our Shop:
- T-shirt
- Sweatshirt
- Hoodies
- Posters
- Mugs
- Stickers
💡 New products will be regularly added to this basic range.
💡 The clothes are made of cotton and polyester. The type of printing is direct printing on the garment which provides excellent image quality. The mugs are ceramic and pass in the dishwasher and in the microwave.
Once all of your products have been chosen, click on "Validate my choice"
5. Personalize your products by
- Defining their name
- Choosing the colors you want to offer your TipRs
- Choosing the available sizes
- By defining your profit, i.e. the amount that will return to you after the sale
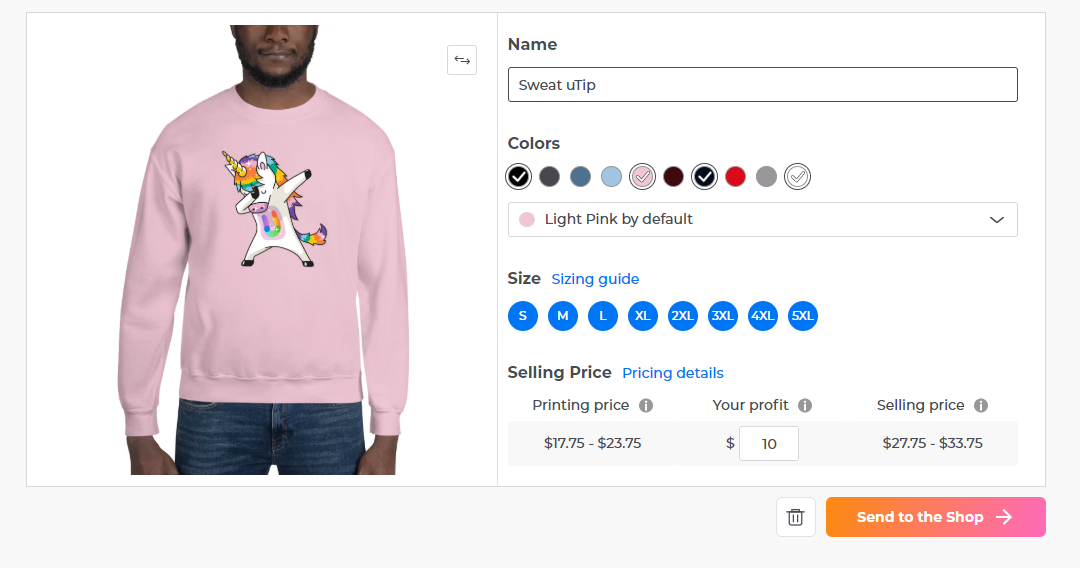
💡 The selling price is made up of the printing price, which is defined by Printful, and which corresponds to the production price of the product, and your profit.
Then click on "Send to Shop"
6. Once your product has been sent to your Shop, a message will appear

💡 In your Shop Printful products can take a little time to get a visual. Don't worry, it's completely normal.

7. Once in your Shop, the product can be modified by clicking on the "..." in the last column
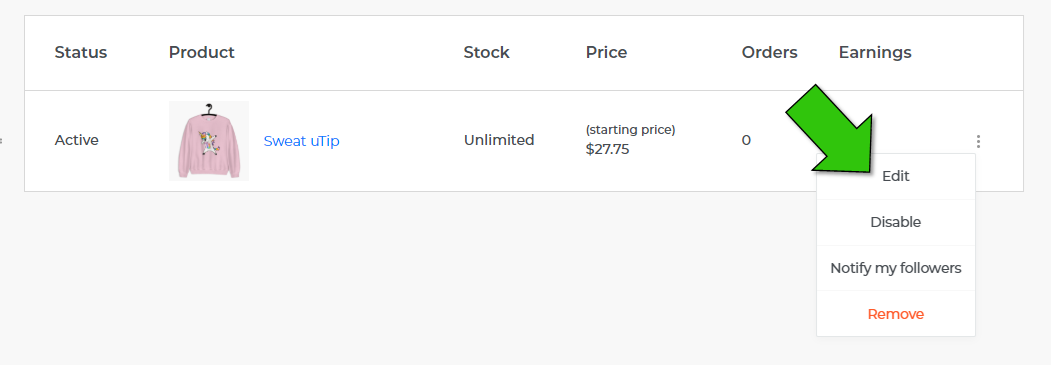
8. All you have to do is enter the description of your product, check its selling price, the color(s) available and the sizes available, customize the link of the garment, then define the available stock, the display and the status of the Shop.
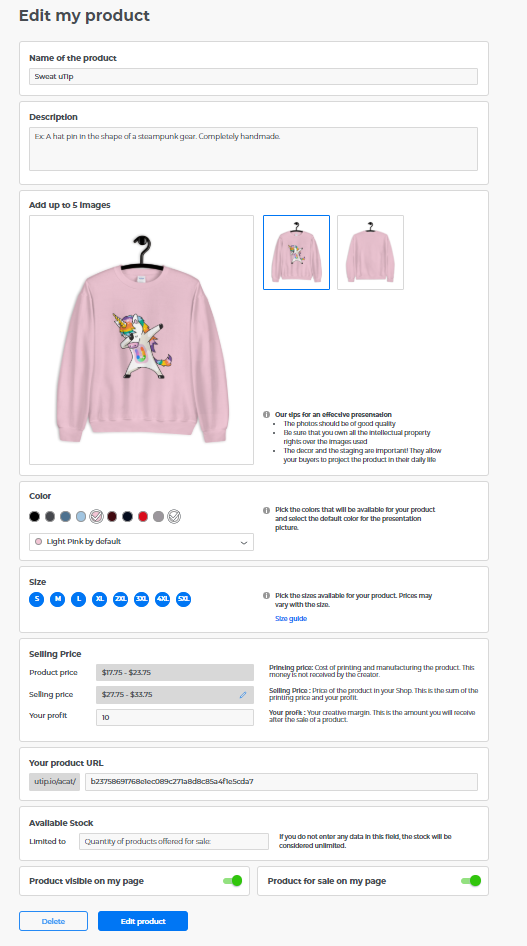
Once done, you just need to validate; your garment now appears in the list of your available products! 🎉
0 0
How to define shipping costs for your physical products according to the destination
It is possible for you to define shipping costs depending on the destination for your physical products, directly on your uTip Shop!
Something to delight your TipRs all over the world !
To define these shipping costs, nothing more simple, here is the procedure to follow:
1. From your profile go to your "Shop"
2. In the case of a new article, click on "Sell one of your products"
3. Select "physical product" and fill in the requested information.
4. At the bottom of the page you will find the section "Shipping costs management "

5. Add one or more destination countries. You can make groups of countries with the same shipping costs.
If you cannot find the country in the list, choose "other".
You can directly select several destination countries 🌍 with similar shipping costs. Here Germany and Albania will have the same shipping costs. It is therefore not useful to create a new tariff for each country independently!
6. Define the shipping costs.

To help you define these shipping costs, we advise you to use a shipping cost calculator
7. Add as many destinations as you want by clicking on "Add a new specific shipping fees"
Other countries, other prices! Group countries with the same shipping fees together.
8. To validate, click on "confirm"
In the case of a product already present in your shop, click on the 3 small dots then on "edit" to access the product page for which you want to add or modify the shipping costs. Resume the tutorial in step 4.
🚨 If your old prices took into account the shipping costs, don't forget to modify them! It would be a shame if your TipRs paid twice for the same thing!
For your country, set the shipping costs to 0 €.
0 0
Support Link
6 August 2020
How to shorten a link?
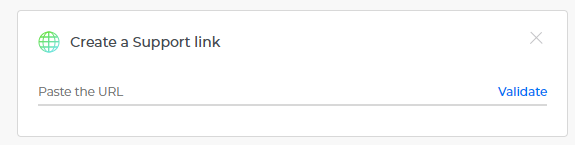
A new toolbar has appeared on your uTip profile page. With it comes a new tool, the function: ". « Create a support Link ».
As its name suggests, this function allows you to generate shortened links from any internet page. But of course, his use does not stop there!
These links allow:
- Mainly, generate shortened links in order to offer internet users to support you on the platform!
- These links are also: easier to share, especially on social networks like twitter, more aesthetic since the URL is more discreet
- An interesting tool that allows you to count clicks, in particular to obtain detailed statistics on the interest of your community for your shares.
You can find the « Shorten a link » function on your profile page after logging in, in the new toolbar on the left side of the page.

Click on it to open the link shortener.
Paste the URL you want to shorten in the dedicated area. If the link does not generate automatically, click on shorten. You will get a new URL at http://utip.io/.
The different types of statutes.
You'll notice «Link Status» just below this URL. Here it says «Advanced link» but several statuses are available. Not all of them will be systematically offered to you, their availability depending mainly on the website from which you have generated a URL.
Generating a « Link only » allows you to generate a simple redirect link. Internet users will be sent directly to the page of your choice, without any mention of the uTip page.
The « Advanced link » allows you to display a landing page with a label with your name asking the user to support you on uTip.
The « Link with support step » allows the user to support your creations before accessing the site of interest. Of course this support step is not compulsory to access the final site!
Finally, the « Advanced link with support step » combines the « Advanced link», showing a label with your name on the landing page and the "Link with support step" offering the user to support you before access the site of interest.
Analytics
You can have access to all of your links generated via analytics. You'll find them in your toolbar on your profile.
Within analytics, you can change the status of your links and find out how many people have clicked on them after sharing.
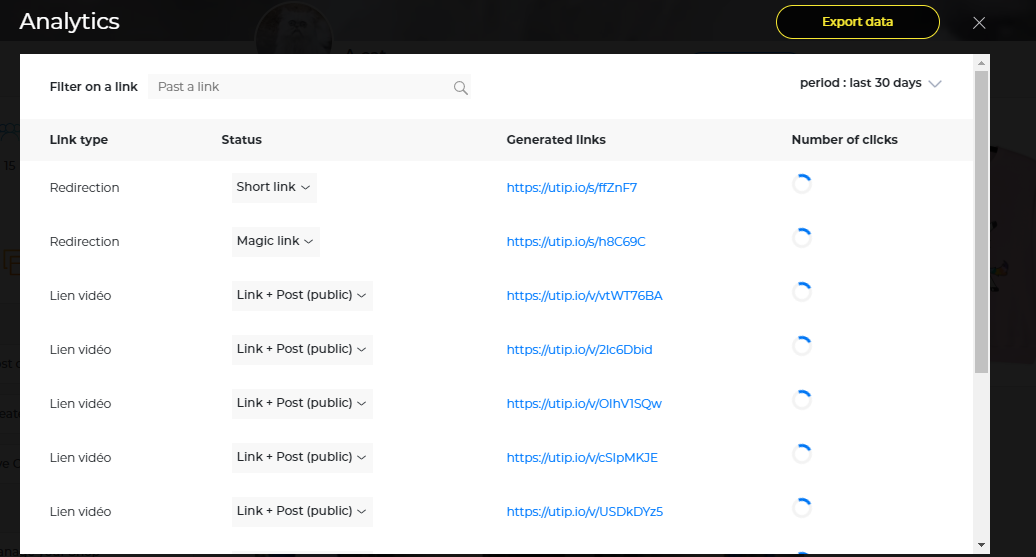
Usually, these analytics are given to you for links generated in the last 30 days. It is possible to modify the period by clicking on "period" at the top right of the table.
Confirm the choice of the new period by clicking on «Apply».
0 0
Video Link
6 August 2020
How to generate a Video Link ?
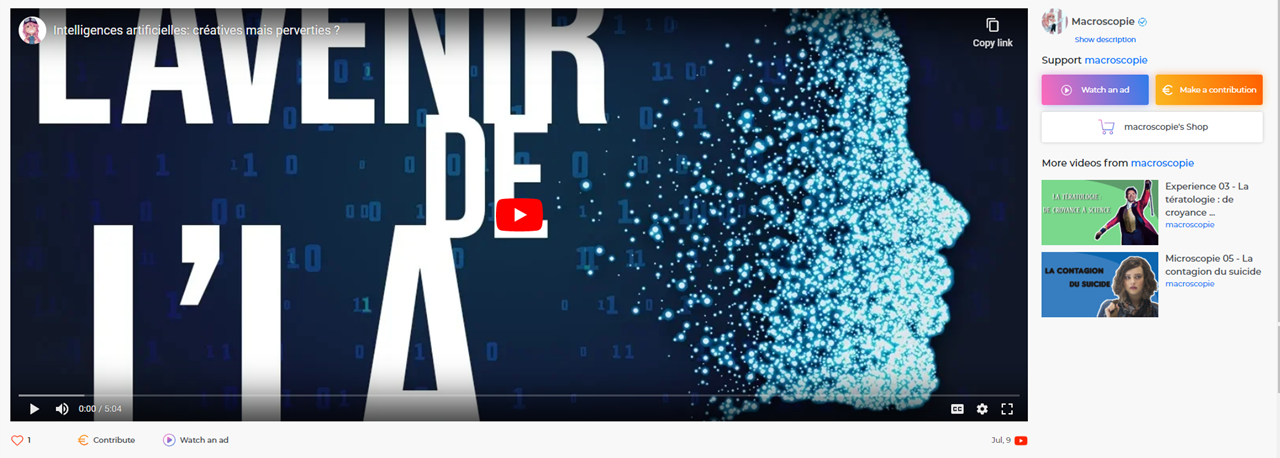
It is possible to generate a "Video Link" from your youtube videos even if they are published in unlisted. This feature allows you to generate a sharing link 🔗 to a video player offering users to support you.
You will find the functionality, "generate a Video Link" within the toolbar present on your uTip profile.

By clicking on "Generate a Video Link" you will open a dialog box allowing you to copy / paste the link of the video of interest.
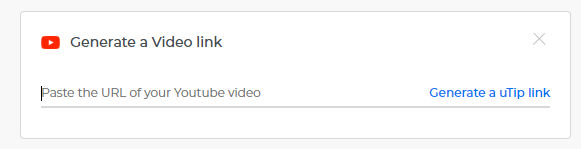
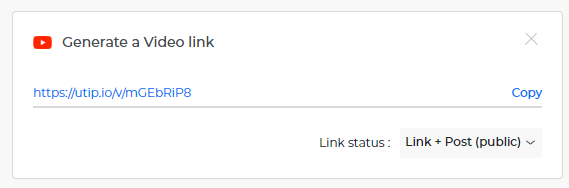
You will get a "utip.io link" which you can share with your community.
This link will sent your community to a page allowing to view your video while offering support solutions to them:
The different link statuses:
There are different link statuses that you can choose by clicking on "link status".
Link only: Allows you to generate a single link which allows the user to view the video while having the possibility of supporting you.
Link + post (public): Allows you to generate a link to the video and post it directly on your Feed. Everyone can see it.
Link + Post (FireTipR): Generate a link to the video and post it directly on your Feed. Only your FireTipRs are allowed to see this post.
Community tools
6 August 2020
How can I see and respond to messages from my TipRs?
This section also allows you to reply to these messages in order to thank your TipRs for this small gesture that makes such a difference! An essential act to create a bond between you and your community.

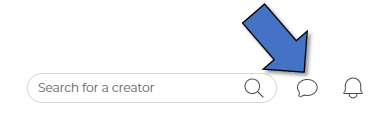
You can access these messages in the « message » tab (represented by a bubble 🗨) in your menu.
The conversation window will then open. You can see all your conversations by clicking on "Show All".

This will open your messaging interface. You can sort your messages according to the sender:
- My community matches the people you support and who support you
- My FireTipRs are the creators for whom you are FiretipRs or who are your FiretipRs
- My creators Correspond to the creators you supported
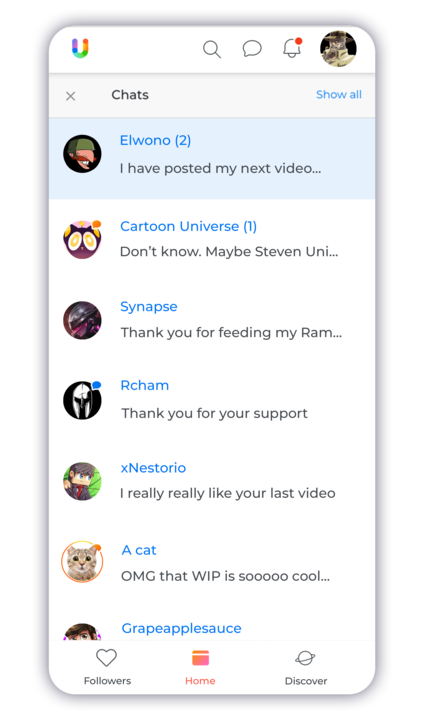
💡 By clicking on "Old mailbox" you can access your old messages.
You just have to respond to your TipRs, if you wish. However, we strongly advise you to do so.
First, your TipRs deserve it: they paid for your creation of their own free will. And a surfer who respects such a moral contract is to be cherished! ❤️
Then, you have to make your TipRs want to come back : the uTip model will be interesting for you if part of your audience takes the habit of paying for your creation once in a while. For this, it is necessary that the use of uTip leaves a positive and rewarding feeling.
0 0
How to modify your "thank you" note?
At uTip, we place particular importance on valuing the person who has agreed to support a creator. And for that, we have what is called the "feel good moment". In other words, once someone has supported you, we will post a message to reward them, while inviting them to repeat their gesture.
And to make this moment one more opportunity to tighten the bonds that unite you to your community, you can personalize this message.📜 Here's how ...
Once a person has supported you (via donation or Shop), they receive a message from you.
In the image above, you can see the message that a creator has chosen to leave to his TipR. It's up to you to customize it according to your community!
Here's how to do it:
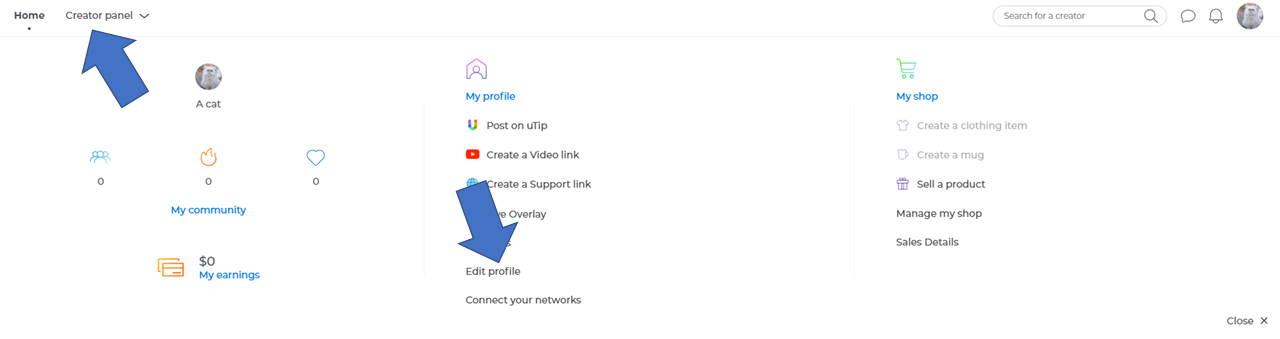
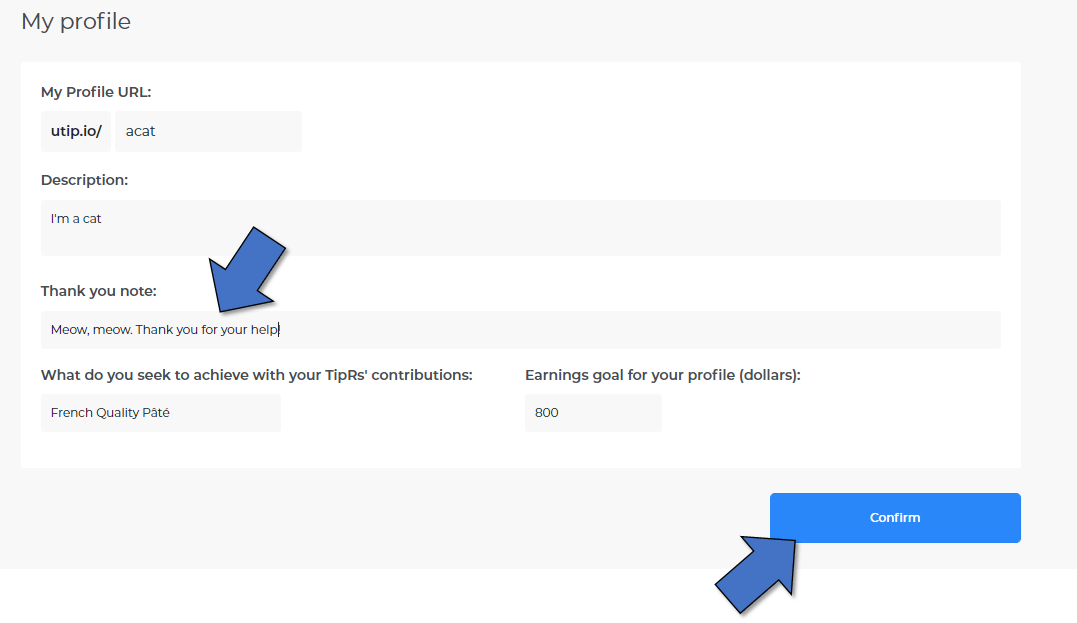
1. Go to "Creator Panel" on the upper right, then click on "Edit profile" :
2. At the bottom of the screen, you will find an insert entitled "Thank you note":
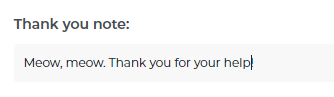
3. Edit this message to enter what you want, add a ton of love and recognition ❤, then click on "confirm":
This "thank you" note is important for two reasons:
First, your TipR deserves it ❤️: they support your creation when nothing forces them to. And a person who respects such a moral contract deserve a "Thank you"! Don't feel like you have to be funny or particularly original! Your goal is to thank your TipRs first!
Then, you have to make your TipR want to come back: the uTip model will be interesting for you if part of your audience takes the habit of paying for your creation once in a while. For this, it is necessary that the use of TipLink leaves a positive and rewarding feeling.
How to reserve content for FireTipRs?
FireTipRs 🔥 are people who have agreed to support you for at least € 1 during the current month. In order to thank them (and encourage others to become FireTipRs too), you can reserve some of your content for FireTipRs only. And here's how ...
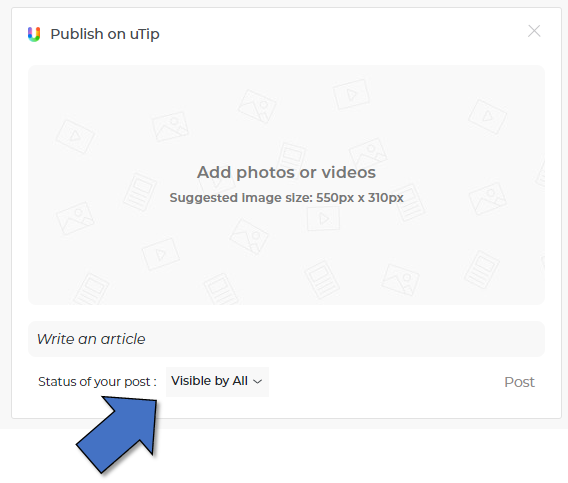
1. When you post a publication, click on "visible by: all", at the top right of the publication box:
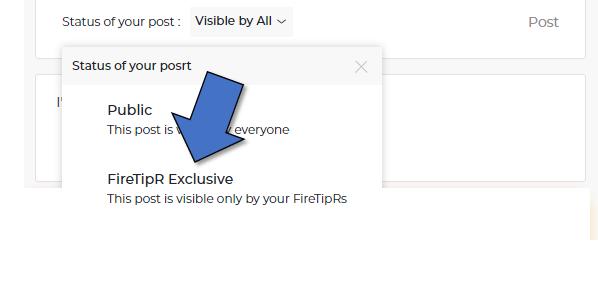
2. Choose "FireTipR Exclusive" :
3. Write your publication
4. Then click on "Publish". Your publication then appears on your feed. The orange frame confirms that it is only accessible to FireTipR 🔥:
Here, you can see what non FireTipR 🔥 users will see:

Overlay
6 August 2020
How do I use the alert overlay "Alert Contributions and Orders"
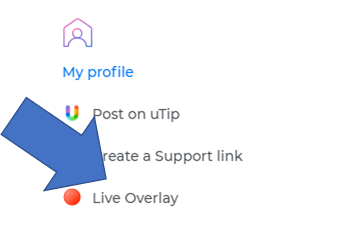
1. Go to your uTip profile and click on "Overlay Live" in your toolbar
2. Click on "Tips and Orders alerts" to generate a stream link to be included in OBS.
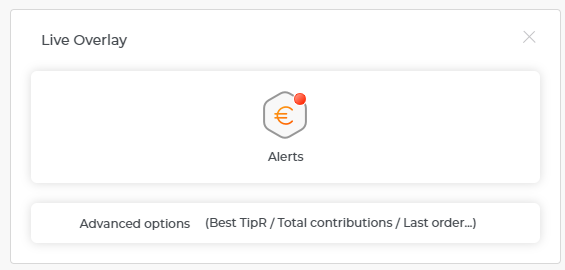
💡 You'll notice the "Advanced Use" button. It allows you to display all kinds of information to use as you wish on your live videos (Best TipR, Total amount collected, last recurring tip...).
3. You can customize your overlay by choosing :
- The minimum amount a Tip must have to trigger the alert (under this amount the alert is not triggered)
- The alert tone that goes with the Tip (3 alert tones are available). FYI: You can customize this alert tones by downloading your own mp3 files.
- The color of the texts so that they are as visible as possible on your stream
- The associated gif. You can customize this gif by uploading your own gif. Please note: it will be automatically resized.
- The length of the alert in seconds
- The volume of your alert 1 being the lowest sound and 10 being the loudest.
⚠️ Remember to refresh the OBS cache after each change made on your overlay
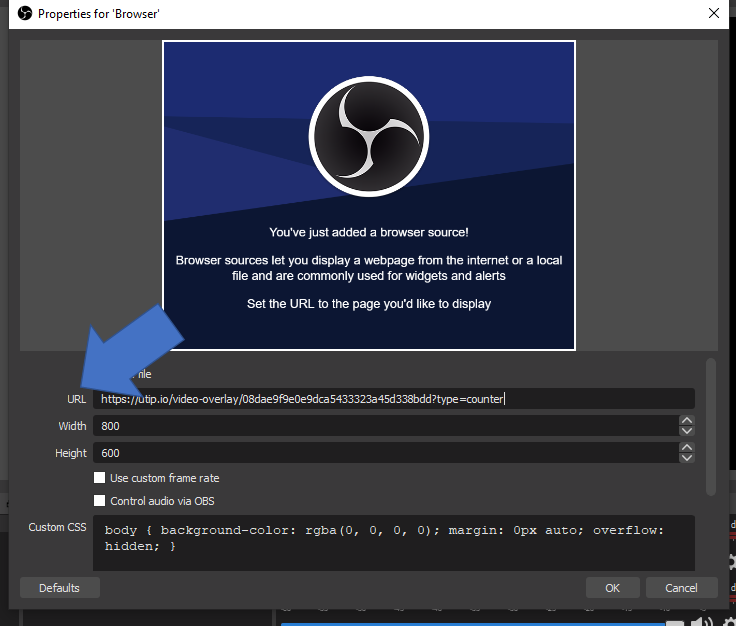
4. Once you have copied the URL, go to OBS. In the "Sources" panel, select "Browser".
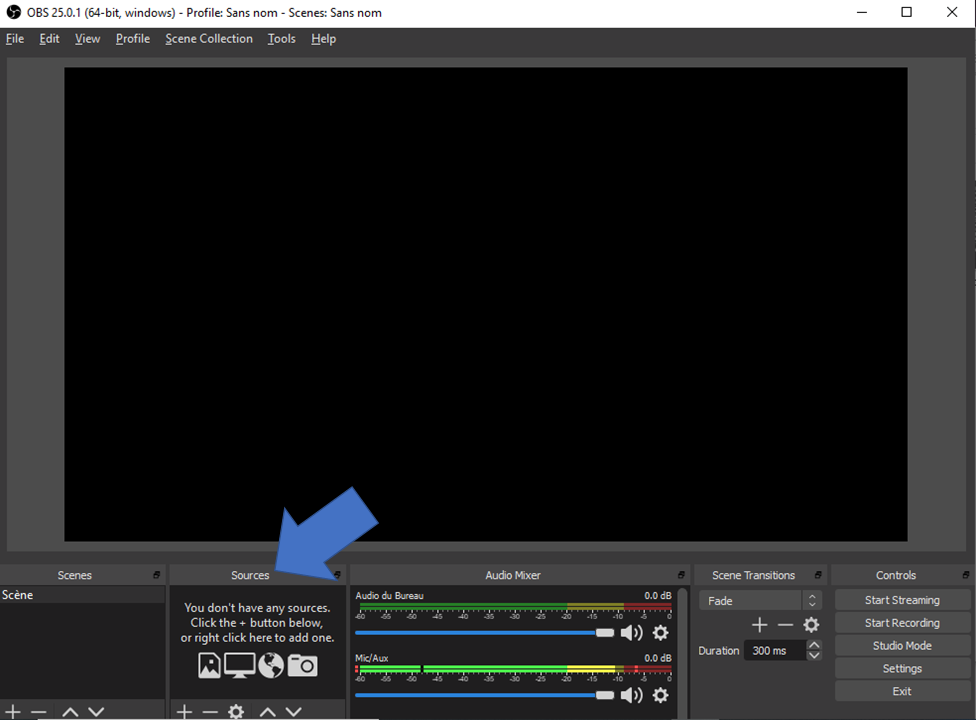
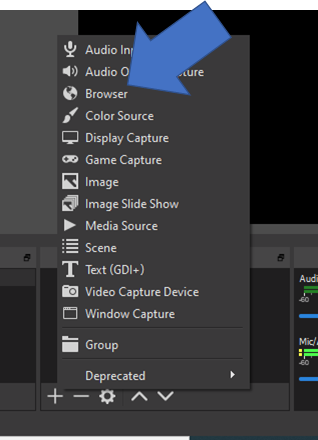
5. Create a new source. It's time to copy/paste your URL in the area dedicated to this. Finally click ok.
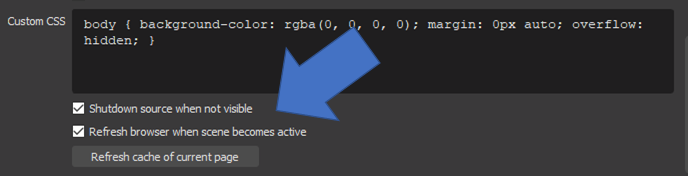
⚠️️ To not appear constantly live on uTip check the following two boxes in your overlay options.
6. Your uTip overlay now appears on your Stream window. You can move it wherever you want! All you have to do now is stream as usual!
You can test your overlay thanks to the "🔔 Send a test alert" button which will invoke the Big DabUnicorn on your Live to verify that the alerts are displayed.
💡 This overlay will be triggered when a Tip or an Order equal to or greater than the minimum amount is made on your uTip profile. So, don't forget to mention it during your live.
⚠️ Remember to refresh the OBS cache after each change made on your overlay.
I'm constantly "live" on uTip even though I'm not streaming, what shoud I do?
When you start your stream, uTip shows you as live 🔴.
We indicate "live" from the moment one of the overlays is used in the active scene, even if the stream is not started. So, if OBS opens with a scene that contains an active overlay, the Live icon appears.
To not appear constantly online on uTip, check two boxes in your overlay options on OBS.
Make sure you have checked the boxes
- "Shutdown source when not visible"
- Refresh browser when scene becomes active
These boxes are present at the bottom of your overlay options.
💡 Remember to close your OBS when you stop live streaming.
💡 If you want to keep OBS open, then create another scene in which overlays are not present and, stay on this scene, when you are not live, .
0 0
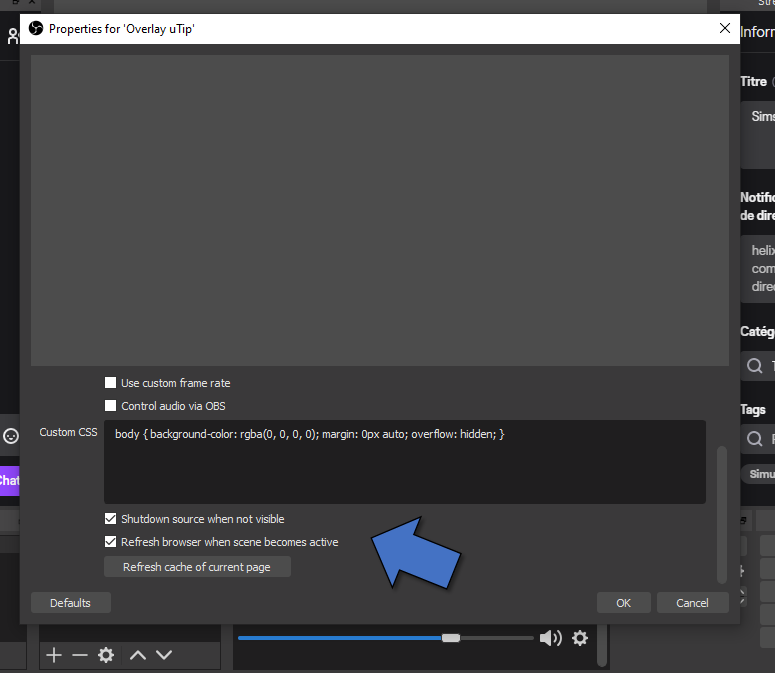
How to refresh the cache of my overlay in OBS?
To take in account the modifications made to your overlays in OBS, you need to refresh the cache of your overlay.
To do this, double-click on your overlay in OBS (you will find them in "sources").
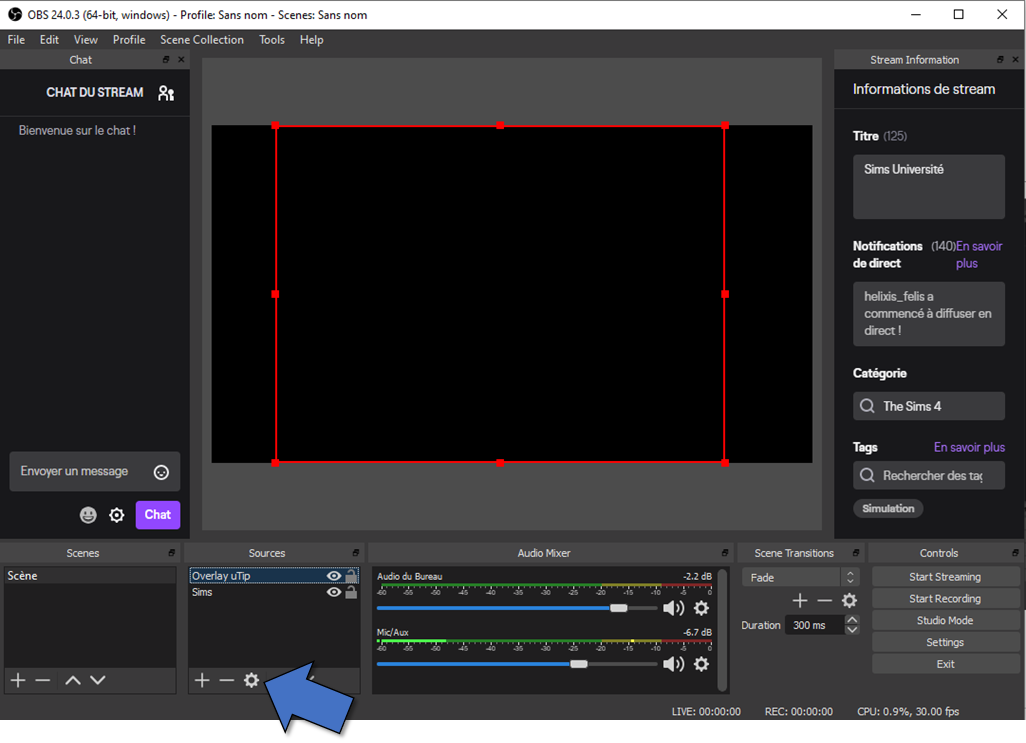
At the bottom of the options, there will be a button to "refresh the cache of this page", click on it:
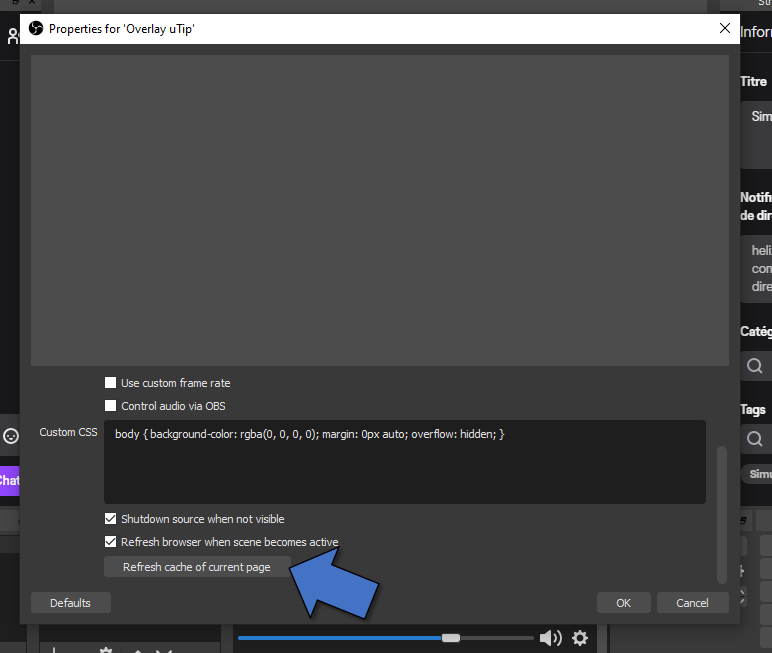
The changes made to your overlay on your uTip interface will then be taken into account in OBS.
Why aren’t my overlays working?
If your overlays do not seem to work on your live, check first that you have integrated them into your stream software: OBS.
If you've integrated your overlays into OBS and they don't work, delete the source and recreate it.
You can also empty the cache of your overlays as follows:
Close OBS and delete the contents of the following folders
C: \ Users \ USER_NAME \ AppData \ Roaming \ obs-studio \ plugin_config \ obs-browser \ Cache
C: \ Users \ USER_NAME \ AppData \ Roaming \ obs-studio \ plugin_config \ obs-browser \ Code Cache
If you are using streamlab OBS, delete the contents of the following folder:
C: \ Users \ USER_NAME \ AppData \ Roaming \ slobs client \ plugin_config \ obs-browser \ Cache
If the problem is still not resolved, contact Brian at brian@utip.io
Discord
6 August 2020
How to assign a role on discord to your FireTipRs?
We suggest that you give your FireTipRs a particular discord role. If you don't know what a FireTipR is, go to our dedicated article. This role can reward their support! 💪
To define this role, go to your "Creator Panel" and in "connect your networks"
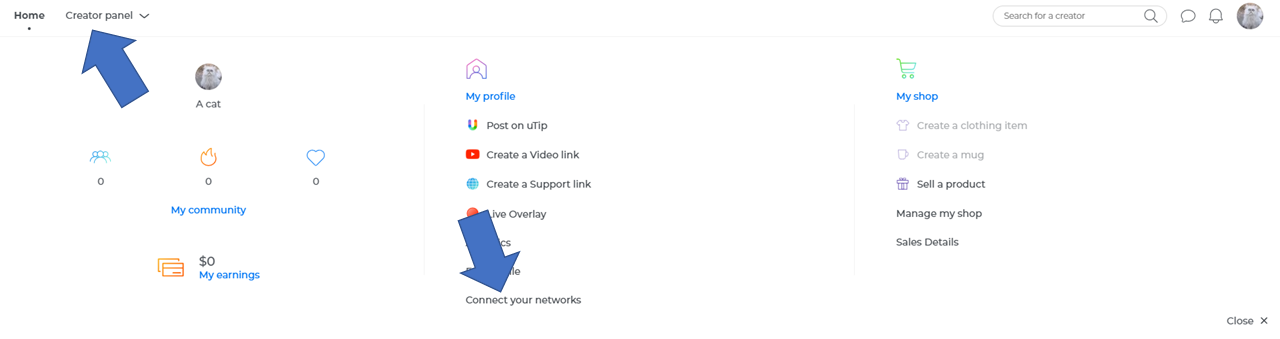
A section is then dedicated to "Choosing the role of FireTipRs on your Discord"

Here, no discord is connected so it is not possible to define a role. So let's start by connecting our discord!
For this in the same tab click in "Add a new connection to a network" on the discord icon.

Select a server and allow permissions to the "uTip" role that will be created. You can change this name and its permissions later. Then click on "Authorize".
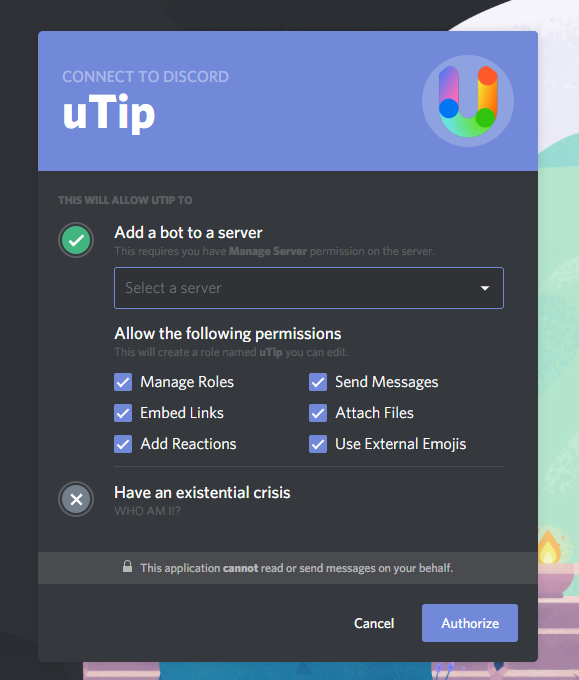
A new "uTip bot" member and a new "uTip" role will have been created on your server.
Then come back to the uTip site and in the "choose the role of FireTipRs" section define the role you want to give them. Here they will have the role "Fire Unicorn 🦄🔥".
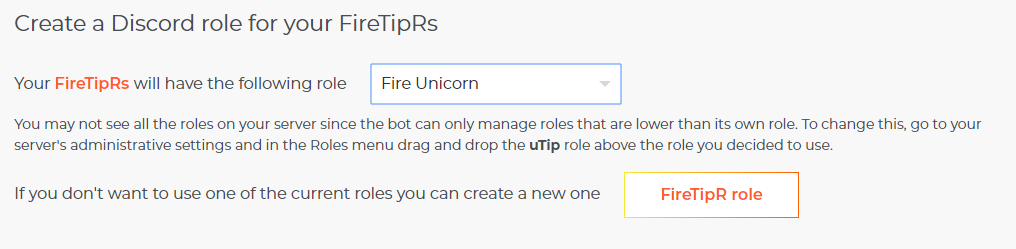
⚠️ If you do not see all the roles of your server, it is because our bot can only manage those who are hierarchically below it. To change this, you can go to your server administration, in the Roles menu and drag / drop the uTip role higher than the role you want to use.
⚠️ If no role suits you, simply click on "create a new FireTipRs Role".
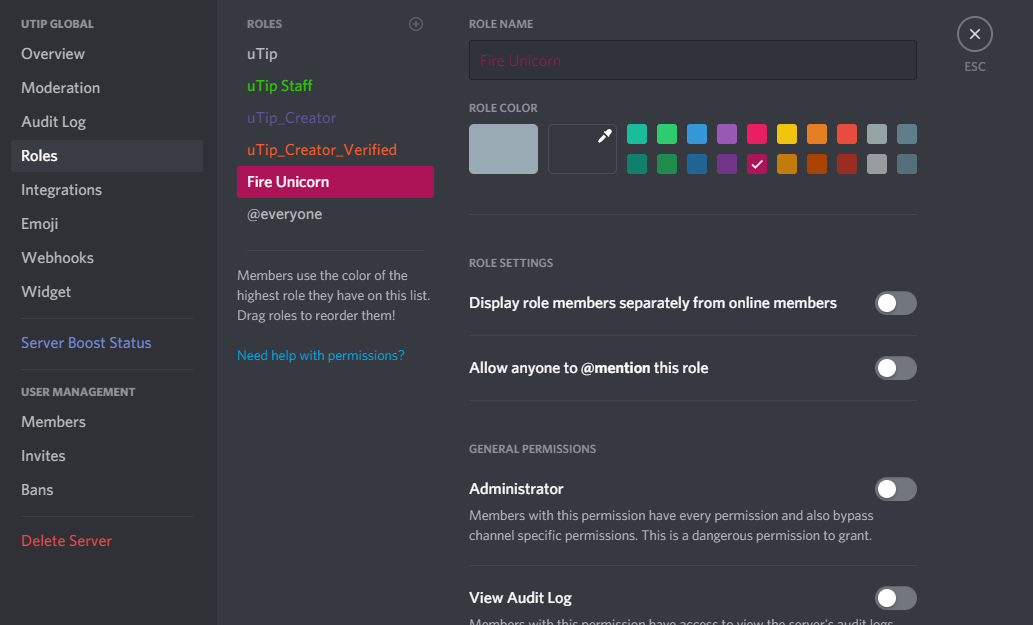
You will be able to modify this role by going to the server settings and then in the role section. You can change the name and the color of the role. Here, the "uTip" role becomes the "Fire Unicorn" role and takes on the pink color.
And there you go! Now your FiretipRs can display a beautiful role!
0 0